Triton是Nvidia发布的一个高效的部署工具,支持多种部署方式,包括gpu、cpu等等,采用rpc调用方式,方便模型的部署,同时在性能优化方面,支持多实例、动态组batchsize等操作,实现动态批处理,并支持多种后端,支持多种模型,多实例间采用多进程处理实现模型并行,可以高效的提高服务速度。
作者:Nvidia
Docs: docs 链接
Github:https://github.com/triton-inference-server/server
官方介绍:知乎可以搜索: NVIDIA Triton 系列文章(9)
一、Triton的安装 Triton是通过RPC进行调用的,所以需要triton-server与triton-client
二、Triton的模型参数配置 安装完成之后,就可以使用triton来给自己的项目进行部署了,Triton目前支持的后端还比较多,比如:onnx、tensorrt、tensorflow、pytorch、python、dali、openvino等都是支持的,所以,只要你的模型或者操作可以使用这些实现,那么就可以使用Triton进行部署了。那么如何部署呢?
参考这个官方example:https://github.com/triton-inference-server/server/tree/main/docs/examples/model_repository/densenet_onnx
下面解释说明一下:
triton的默认部署组织文件结构是下面这样的,所以,只要我们仿照这个结构,新建我们自己的文件夹就行了。
1 2 3 4 5 model_repository/ └── inception_graphdef ├── 1 │ └── model.graphdef ├── config.pbtxt
新建一个model_repository文件夹,放我们需要用triton部署的模型或者操作(比如预处理这种,虽然不是模型,但是可以使用python实现,也是可以使用triton得 )
新建节点文件夹,比如上面的例子,节点是inception_graphdef,很明显,看这个文件名就知道是tensorflow相关的,如果你是resnet50模型,也可以取名resnet50_onnx或者resnet50_trt等。
在2的步骤之下,主要有两个东西比较重要,一个是config.pbtxt(这个名字不要改,就是他 )用来配置该节点的操作,比如:实例数,maxbatchsize等。另一个文件夹1(这个1代表版本,默认就是1 ),1文件内放的就是对应的模型,可以是onnx、tensorrt或者python脚本等。
结构介绍完,介绍一下config.pbtxt,这个也是triton最重要的一个文件。
1 2 3 4 5 6 7 8 9 10 11 12 13 14 15 16 17 18 19 20 21 22 23 24 25 26 27 28 29 30 31 32 33 34 35 36 name: "touchbreast_onnx" # 这个必须要model_repository下面的文件夹名字一致,当然也可以不写这个参数 platform: "onnxruntime_onnx" # 这个代表的是这个节点是一个onnx类型 default_model_filename: "touchbreast_model.onnx" # 默认启动的模型,如果没有会找名字为 model对应的模型,这里就是model.onnx,如果指定了就找指定的 max_batch_size : 4 # 如果不支持动态batch,set to 0 input [ { name: "INPUT" # must have data_type: TYPE_FP32 # must have dims: [ 3, 224, 224 ] # must have } ] output [ { name: "OUTPUT" data_type: TYPE_FP32 dims: [ 2 ] } ] dynamic_batching { max_queue_delay_microseconds: 5000 # 微秒为单位 } instance_group { count: 8 #这里代表启动8个实例 kind: KIND_GPU } ## 如下参数代表自动做在线tensorrt加速,如果配置了下面参数,注意使用的时候要先warmup,不然前面会比较慢。 optimization { execution_accelerators { gpu_execution_accelerator : [ { name : "tensorrt" parameters { key: "precision_mode" value: "FP16" } parameters { key: "max_workspace_size_bytes" value: "1073741824" } }] }}
备注: 对于模型没有指定的input和output的时候,比如噢torchscript模型,可以指定为input__0, input__1, output__0, output__1这种,可参考文档中Model Configuration中的input、output那节
名字为1的文件夹内的模型就没啥可说的了,以onnx为例,只要onnx的输入输出和config.pbtxt中的模型input和output名字对上就行了。
三、Triton的模型启动 配置好上面的模型配置后,运行如下命令就可以启动triton服务了
1 2 3 4 tritonserver --log-verbose=100 --exit-on-error=true --strict-model-config=false --model-store=/app/models # 如果端口被占用,也可以使用下面参数修改端口 --grpc-port 8005
成功启动后,会出现如下显示:
四、Triton 如何调用 参考下面的代码即可,主要如下几个步骤:
1 2 3 4 5 6 7 8 9 10 11 12 13 14 15 16 17 18 19 20 21 22 23 24 25 26 27 28 29 30 31 32 33 34 35 36 37 38 39 40 41 42 43 44 45 46 47 48 49 50 51 52 53 54 55 56 57 58 59 60 61 62 63 64 import tritonclient.grpc as grpcclient import numpy as np class TritonInfer: def __init__(self, args): self.input_name = "INPUT" self.output_name = "OUTPUT" self.model_name = "test_triton" self.url = os.environ.get("TRITON_SERVER_URL", "localhost:8001") self.triton_client = grpcclient.InferenceServerClient(url=self.url) self.outputs = grpcclient.InferRequestedOutput(self.output_name) if args.input_data_type == 'string': in_0 = np.array(list("helloworld"), dtype=np.object_) elif args.input_data_type == 'fp32_chw': img = cv2.imread('test_img.jpg') img = cv2.resize(img, (224, 224)) in_0 = img elif args.input_data_type == 'uint8': in_0 = np.fromfile('test_img.jpg', dtype='uint8') else: print('error : load data type error') self.in_0 = None if args.batch == 'True' or args.batch == 'true': self.input_data = in_0[np.newaxis, :] else: self.input_data = in_0 if args.input_data_type == 'fp32_chw': self.inputs = grpcclient.InferInput(self.input_name, self.input_data.shape , datatype="FP32") self.inputs.set_data_from_numpy(self.input_data.astype(np.float32)) elif args.input_data_type == 'uint8' or args.input_data_type == 'string_uint8': self.inputs = grpcclient.InferInput(self.input_name, self.input_data.shape , datatype="UINT8") self.inputs.set_data_from_numpy(self.input_data.astype(np.uint8)) elif args.input_data_type == 'string': self.inputs = grpcclient.InferInput(self.input_name, self.input_data.shape , datatype="BYTES") self.inputs.set_data_from_numpy(self.input_data.astype(np.object_)) else: print('error: input data type set in cfg error! please check') exit(0) def run(self): try: triton_results = self.triton_client.infer( model_name=self.model_name, inputs=[self.inputs], outputs=[self.outputs]) except: triton_results = 0 output = triton_results.as_numpy( self.output_name ) return triton_results
五、perf_analyzer 最简单的测试如下:
1 perf_analyzer -m test_triton
如果需要测试多个客户端,可以加上–concurrency-range 1:10:3 ,代表 start:end:step
1 perf_analyzer -m test_triton --concurrency-range 1:10:3
如果需要指定shape,–shape
1 perf_analyzer -m test_triton --shape INPUT:60000 --concurrency-range 1:10:3
如果需要指定输入数据,–input-data
1 perf_analyzer -m test_triton --input-data imgread.json --concurrency-range 1:10:3
可以通过help查看所有的参数
六、python后端 如果我们要跑的是模型,直接使用onnx、tensorrt等后端即可,但是如果我们需要一些操作,比如:预处理,比较简单的方法是利用python后端来实现。
python后端只需要将文件夹中的模型变成model.py(其中是实现的功能代码 )
config.pbtxt中 backend: “python”
1 2 3 4 5 model_repository/ └── inception_graphdef ├── 1 │ └── model.py ├── config.pbtxt
参考github的说明:https://github.com/triton-inference-server/python_backend
如下是一个预处理的例子:主要就是下面的四个函数,需要注意的是在auto_complete_config中需要设置max_batch_size()和dynamic_batching(),在config.pbtxt中设置maxbatchsize是不生效的。
1 2 3 4 5 6 7 8 9 10 11 12 13 14 15 16 17 18 19 20 21 22 23 24 25 26 27 28 29 30 31 32 33 34 35 36 37 38 39 40 41 42 43 44 45 46 47 48 49 50 51 52 53 54 55 56 57 58 59 60 61 62 63 64 65 66 67 68 69 70 71 72 73 74 75 76 77 78 79 80 81 82 83 84 85 86 87 88 89 import json import triton_python_backend_utils as pb_utils import torch from torch.utils.dlpack import to_dlpack import numpy as np import copy class TritonPythonModel: """Your Python model must use the same class name. Every Python model that is created must have "TritonPythonModel" as the class name. """ def auto_complete_config(auto_complete_model_config): auto_complete_model_config.set_max_batch_size(1) auto_complete_model_config.set_dynamic_batching() return auto_complete_model_config def initialize(self, args): self.model_config = model_config = json.loads(args['model_config']) output_config = pb_utils.get_output_config_by_name( model_config, "OUTPUT") # Convert Triton types to numpy types self.output_dtype = pb_utils.triton_string_to_numpy( output_config['data_type']) def execute(self, requests): """`execute` MUST be implemented in every Python model. `execute` function receives a list of pb_utils.InferenceRequest as the only argument. This function is called when an inference request is made for this model. Depending on the batching configuration (e.g. Dynamic Batching) used, `requests` may contain multiple requests. Every Python model, must create one pb_utils.InferenceResponse for every pb_utils.InferenceRequest in `requests`. If there is an error, you can set the error argument when creating a pb_utils.InferenceResponse Parameters ---------- requests : list A list of pb_utils.InferenceRequest Returns ------- list A list of pb_utils.InferenceResponse. The length of this list must be the same as `requests` """ output_dtype = self.output_dtype responses = [] input_dicts = [] for request in requests: # Get INPUT0 in_0 = pb_utils.get_input_tensor_by_name(request, "INPUT") in_0 = in_0.as_numpy() out_tensor = pb_utils.Tensor("OUTPUT", in_0.astype(output_dtype)) inference_response = pb_utils.InferenceResponse( output_tensors=[out_tensor]) responses.append(inference_response) # You should return a list of pb_utils.InferenceResponse. Length # of this list must match the length of `requests` list. return responses def finalize(self): """`finalize` is called only once when the model is being unloaded. Implementing `finalize` function is OPTIONAL. This function allows the model to perform any necessary clean ups before exit. """ print('Cleaning up...')
其他注意事项:
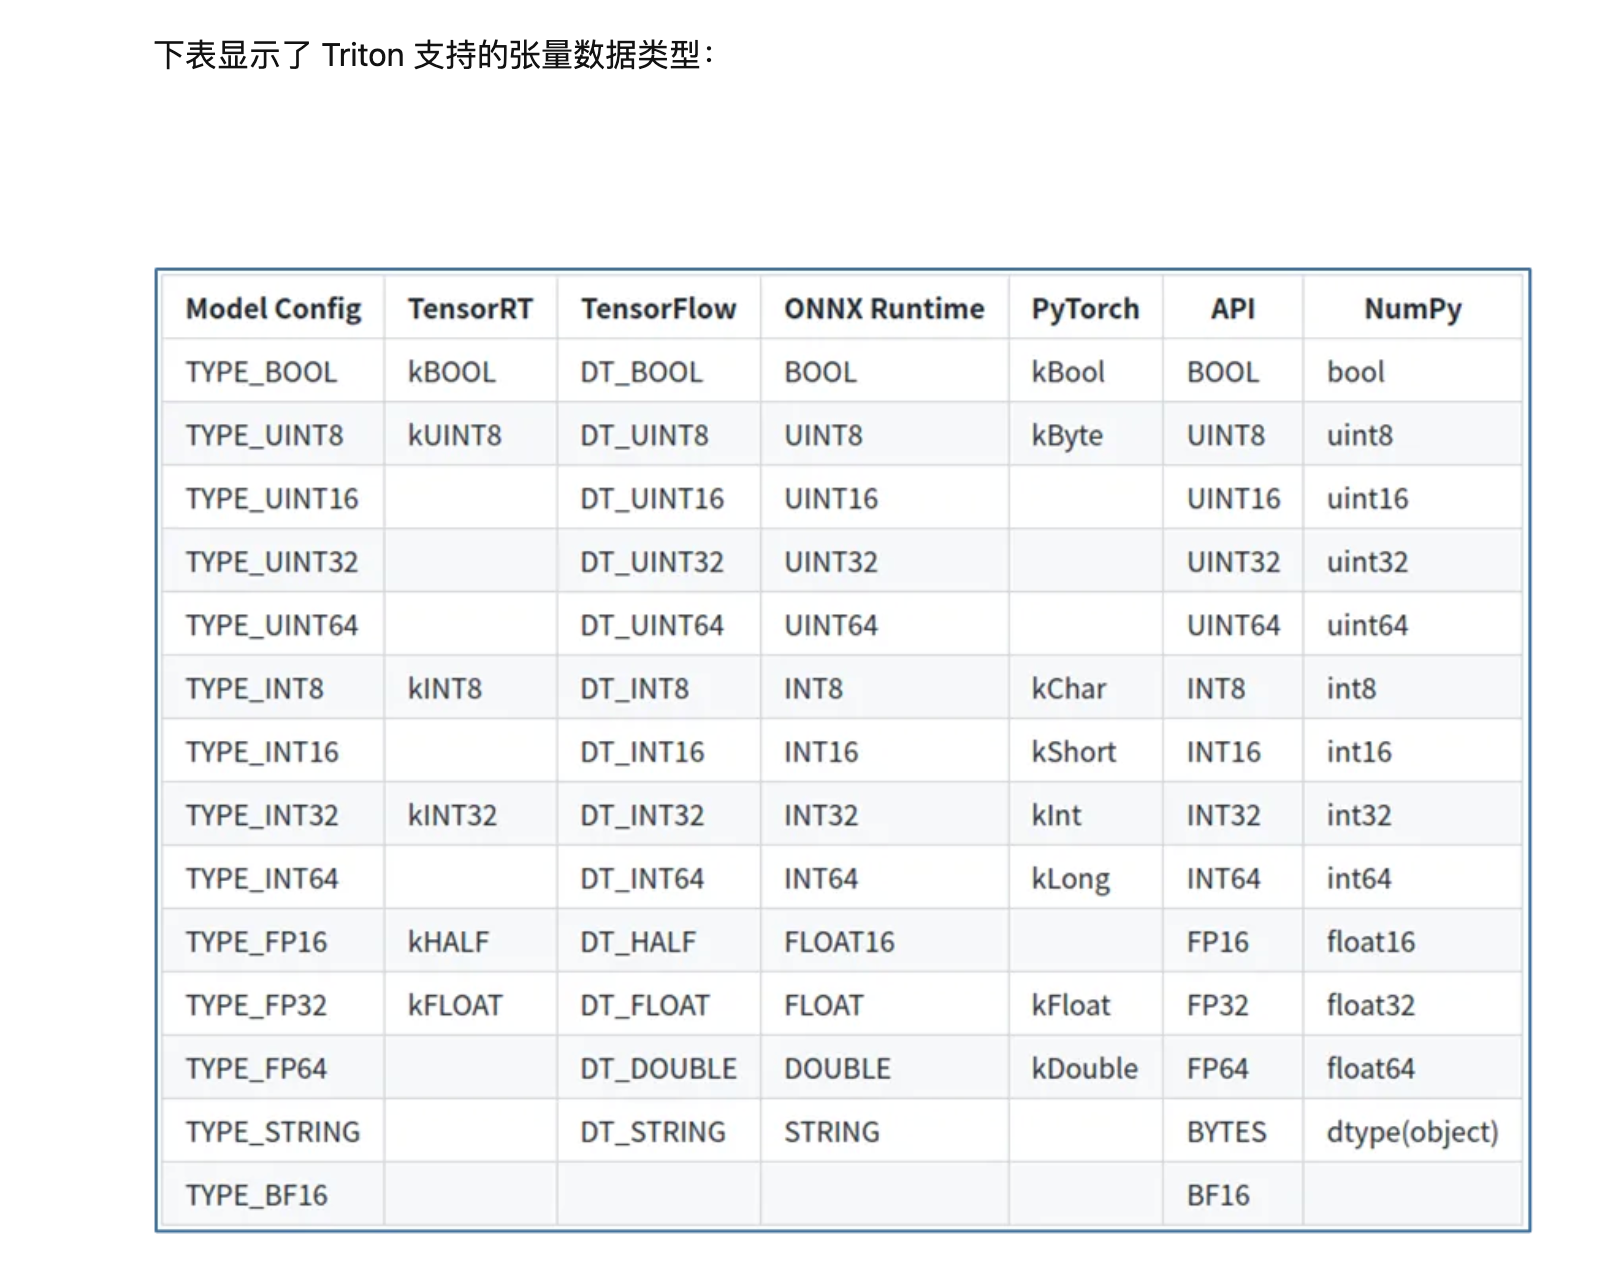
模型的INPUT最好不要设置成BYTES类型,会很慢,设置成UINT8会快挺多的